How to add a product ? (Everything you need to know)
This support post is going to teach you how to add a product on your online store. For a simple product, you will just need to follow the “Basics” part.
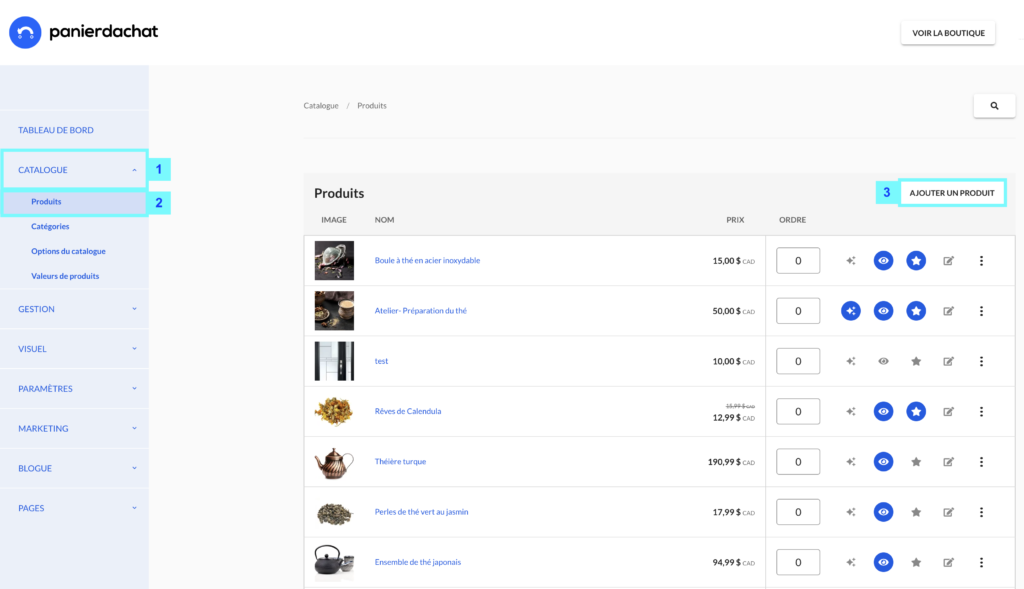
On your merchant interface, click on Catalog (1) then Products (2). In this new page, click on the Add a product button (3).
Details and explanations of the page creation / modification of a product
The creation is divided into 3 parts:
- The basics
- The variants
- The options
The basics of your product sheet
The basics parts : Photos, Product name, Description, Price, Stock and Categories.
For a simple product you only need to fill in this information in order to register your product.
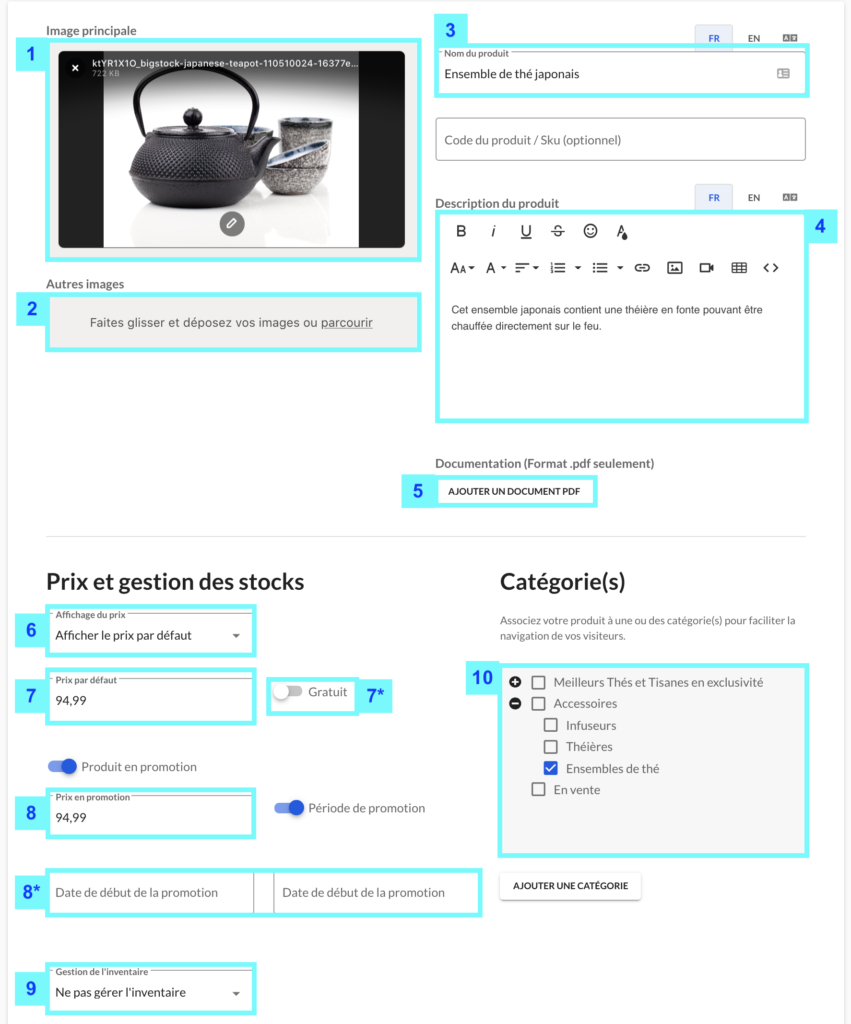
Here is the explanation of the 10 points of this 1st part:
1) Add the main image of your product. The image will be the one that will represent the product on your store. You can drag the image into the gray frame or search for it on your computer by clicking “browse”.
2) Add secondary images.These images will be added to the product page, the customer can scroll through them after the main image. You can drag multiple images at the same time in the gray frame.
3) Enter the name of the product. Think of both languages if you have French and English.
4) Add a description to the product. Be technical and seller.
5) Add PDF files that your visitors can download. Often used for technical and detailed sheets.
6) Choose the price display option. If your product doesn’t have values, only the 2 first options below are available :
- Display the default price : e.g. 17.95$
- Do not display price : No price is displayed, the product can’t be buy
- *Display “From *minimum price*” : e.g. From 19.95$)
- *Display “mini-maxi” price : e.g. 14.95$-34.95$)
*only available for products with values
7) Indicate the default price of your product.
7*) If the product is free, you just need to activate this checkbox. Do not write 0 as a price.
8) Add a sale price. Activate the button “Product on sale” and fill the field with the sale price.
8*) Activate the button to program the sale period. Then click on the fields “Sale start date” a calendar will appear to choose the day and hour. Repeat this for the “Sale end date”,
All info to schedule a promotion here.
9) Pick the type of stock management. Below the types available :
- Do not manage inventory : The product will be available online without limit.
- Manage inventory : You will need to inform a stock. The product will pass to “Out of stock” once the stock reach 0.
- Manage inventory with variants : If the product has cumulate values (variants), you can chose this type of management and inform astock for each variant (23).
10) Assign a category to your product. Check the category you have already created or add to a new one by clicking on the “Add category”.
The product values
This part allows you to add values and variants to the products.
E.g. : 1 t-shirt can have size values (S – M – L – XL…) and / or color values (Red – Blue- Black…)
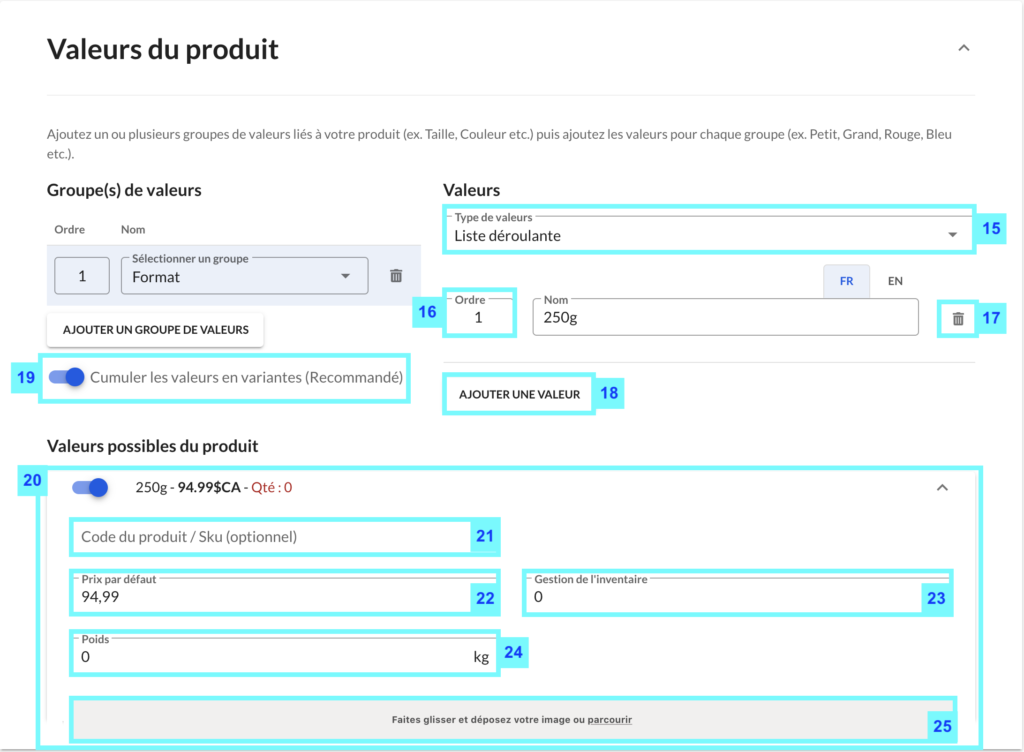
To add values, click on the Product values section (11). Then create a group values by clicking the button (12).
(A) We explain you the difference between cumulate and non-cumulate values in this post.
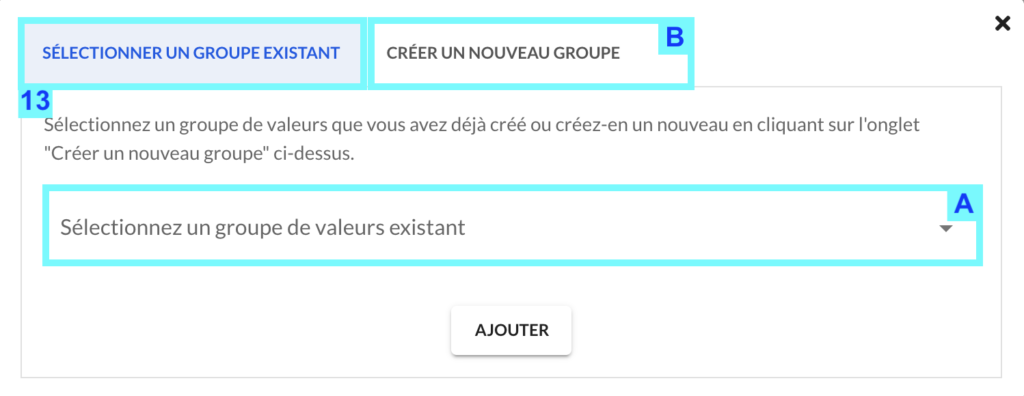
13) Choose between an existing group of values or create a new one. By default, you will be on the selection tab of an existing group, in order to choose one, you simply have to click on the drop-down list (A). If you do not have a group or want to create one click on the tab (B), enter the name of the group and click on “Add”.
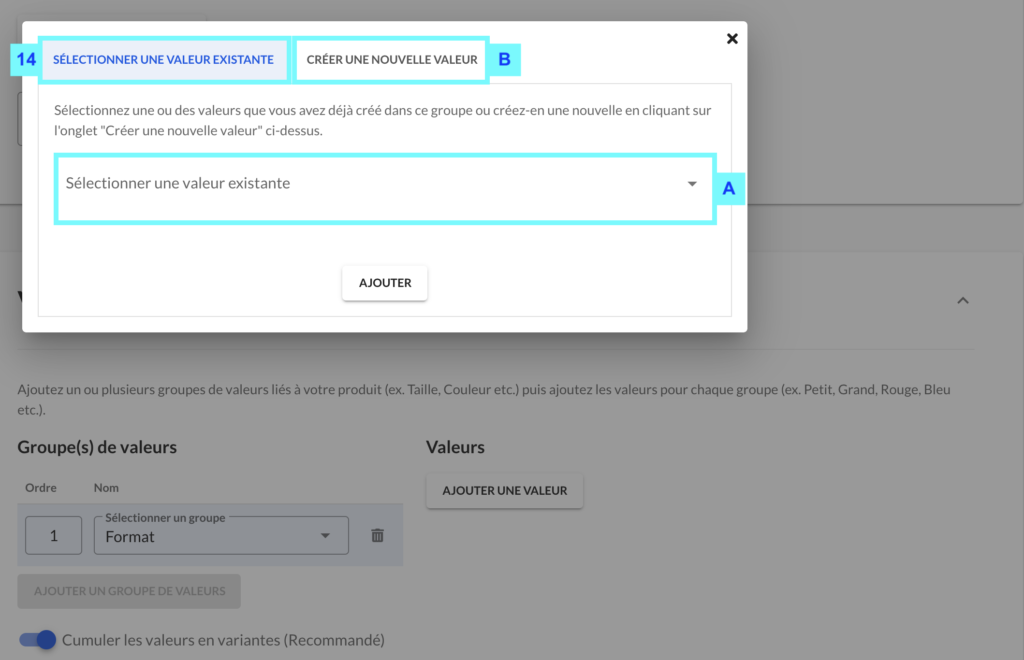
14) Add values to your group. Once your group has been selected / created, you must choose the values you want to add to it. Click on the “Add a value” button. As with adding a group, you can choose to select an existing value (A) or create one with the creation tab (B).
15) Choose the type of display of the values. Values can be displayed in 3 different styles:
- Drop-down list: each value is listed in a drop-down list
- Color dots: you must select a color to represent each value
- Image thumbnails: you must add an image to represent each value
16) Choose the display order of the values.
17) Click this button to remove the value for this product.
18) You can add as many values as you want by clicking on this button which will display the window. (14).
19) You can add up to 3 groups of values (in “Cumulative values” format). On click this displays the window (13).
20) When the values are cumulated, the possible variants are listed below the groups and values. The variants are the results of the cumulative values of your different groups (eg Small and Red).
By clicking on the row of a variant, you can view and edit the information below :
(21) Add a specific SKU to the variant.
(22) Add a specific price to the variant.
(23) Add a specific stock to the variant. This field is displayed only if you selected “Manage inventory with variant”, (step (9)).
(24) Add a specific weight to the variant.
(25) Add a specific image to the variant. It displays as the main image when selecting the values of the variant.
More information on the different styles of values and variants
The product options
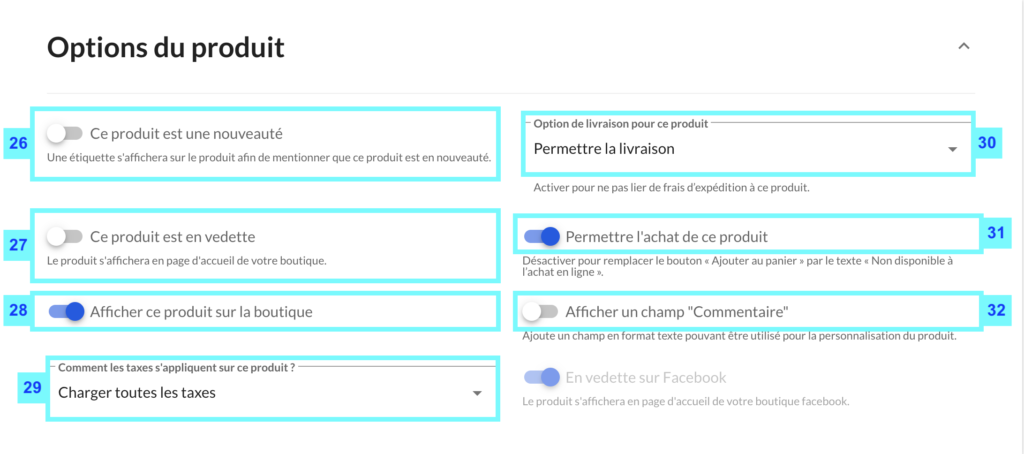
The last 4 sections of the product sheet are optional when creating a product.
26) Activate the button to add this product in the “New” module of the visual editor and to add the “New” icon on the product.
27) Activate the button to add this product in the “Feature” module of the visual editor and to add the “Feature” icon on the product.
28) Disable if you don’t want this product to appear on your store. Allows you to make it unavailable for a certain moment without having to delete it.
29) Choose the taxes to apply to this product. The 3 options are:
- Charge all taxes
- Don’t charge taxes
- Only charge federal tax : for countries/regions with more than once tax.
30) Choose one of the available delivery options:
- Allow delivery
- Do not allow delivery: The product can be purchased with the option of pickup in store or with other deliverables (in this case the mention “This product will not be delivered” will be informed throughout the checkout and on the invoice .
- Offer delivery: Only in an order, the option “Free delivery” will be displayed to your customers. If with other products (not having free delivery) in the same order, it will not be taken into account in the calculations of external suppliers and other shipping methods.
31) Uncheck if you do not wish to allow the purchase of the product. The product will still be displayed on your store but cannot be purchased.
32) Check to give your customer the possibility of adding a comment linked to this product : personalization of the product for example.
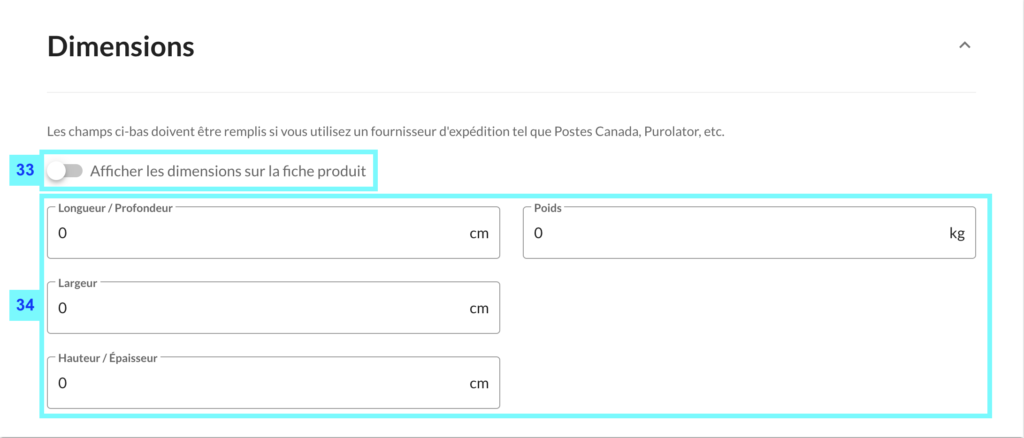
33) Activate, if you want to display the dimensions of your product (indicated in the next point) on the product page.
34) The dimensions are used to automatically calculate delivery prices and allow you to print your labels from home.
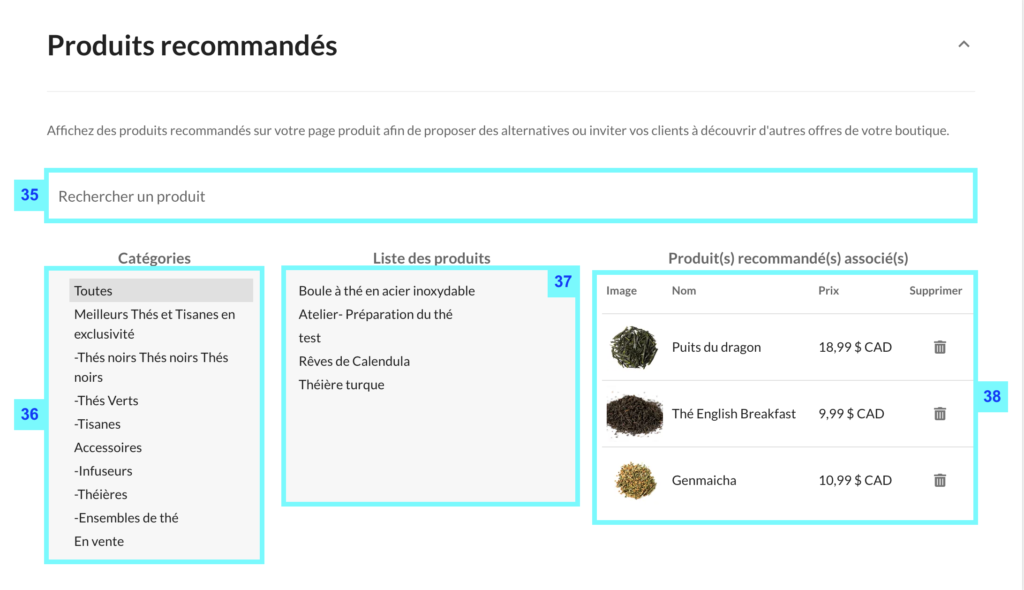
35) Search in this field, by entering the product name you want to add as a recommended product. It will show in the “Product List” (37) , click on it to add it.
36) If you can’t remember the name of the products to add, you can search for the products by category.
37) In this column is listed the searched products which you can then select to add as Recommended.
38) List of associated products. Click on the trash can icon to remove the product.
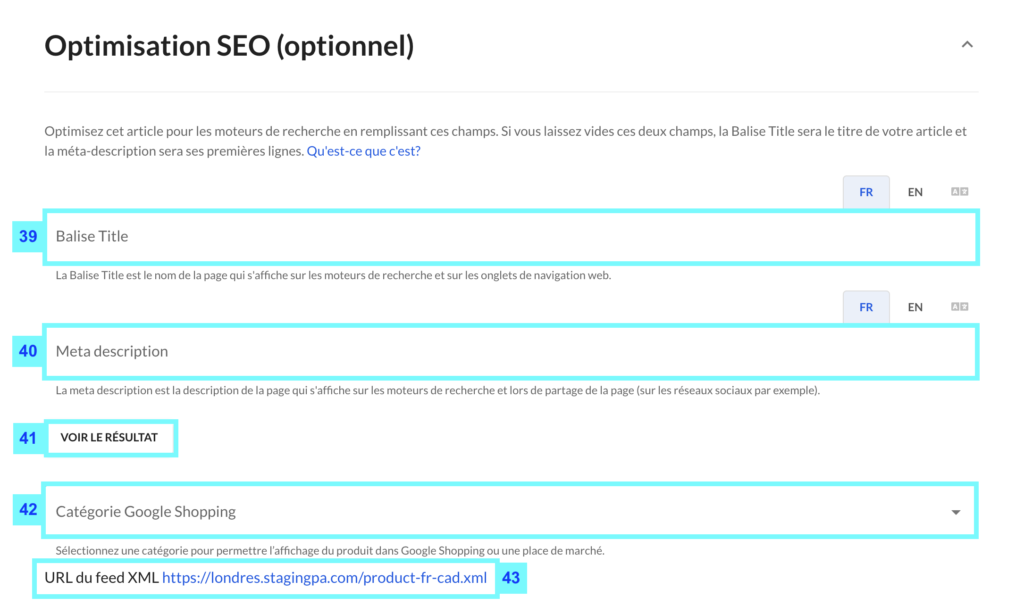
39) Allows you to add a title tag to be more sales and better referenced on Google and search engines.
40)Allows you to add a Meta-description to be more sales and better referenced on Google and search engines.
41) Click to see the result on Google and understand the advantage of points 31 and 32.
42) Allows you to assign your product to a Google Shopping category.
43)You will also find the URL of the XML feed that will be used to configure your Google Merchant Center account to display your product on Google Shopping.
And of course, remember to save.
In your merchant interface, click on “Catalog” then “Products”.
In this new page click on the green button “Add a product”.
Details and explanations of the page creation / modification of a product
The creation is divided into 3 parts:
- The basics
- The variants
- The options
The basics of your product sheet
For a simple product you only need to fill in this information in order to register your product.
Here is the explanation of the 8 points of this 1st part:
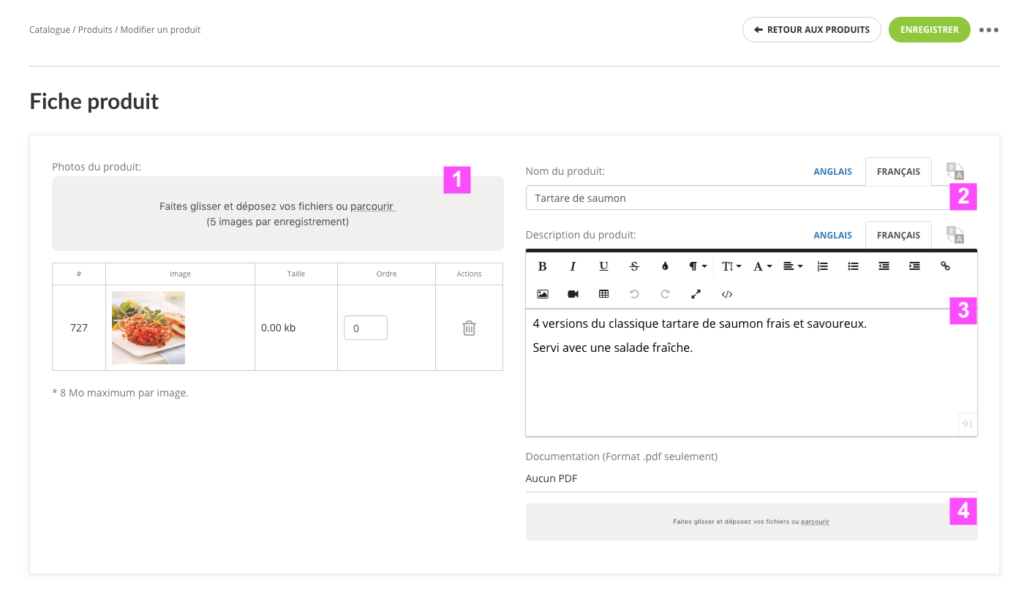
1) Add one or more images of your product. You can drag or search in your computer. You can add up to 5 images per recording, but you can add as many as you want by recording multiple times.
2) Enter the name of the product. Think of both languages if you have added English.
3) Add a description to the product. Be technical and seller.
4) Add PDF files that your visitors can download. Often used for technical and detailed sheets.
5) Indicate the regular price of your product. If it has variants (colors, sizes …) it will be the price added by default that you can change for each variant.
5*) If you want to add a free product, check the box.
6) Indicate the promotional price of your product. For this check the box “On sale”.
6*)Check the box to program the date on promotion. Then click on the empty field, a calendar will appear to choose a date and a precise schedule to the second. (If the calendar does not appear, the correct format to enter is this one: YYYY-MM-DD HH: MM: SS is 2019-09-04 14:08:29)
All info to schedule a promotion here.
7) Choose whether you want to manage the stock of this product or not. If your product does not have a variant, you will indicate the stock in a field just below. If you have variants, the inventory is done in the table (see (20))
8) Assign a category to your product. Check the category you have already created or add to a new one by clicking on the “Add category” button.
The variants
This part is optional. It is used to add variants to your product. Examples: 1 t-shirt can have a variant of sizes (S – M – L – XL …) and / or one of colors (Red – Blue – Black …) …
To discover this table click on the button “Add variants”, By default the option New will be created you can modify it in the frame (10)
See here the detailed help article to create variants and variants with image.
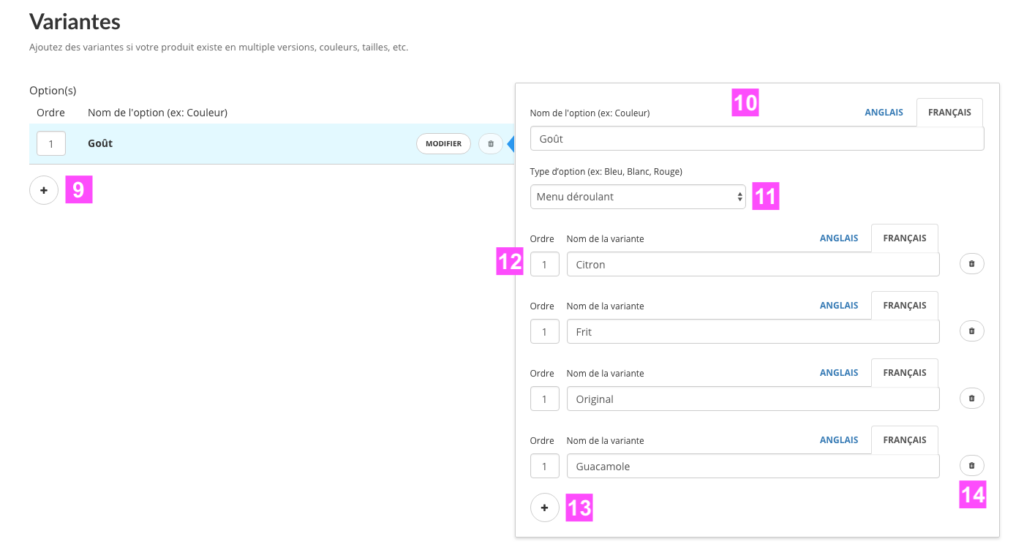
9) Add a new variant option. Add option sizes, colors, taste…
10) Change the option’s name.
11) Choose the presentation format of the option. You can choose between the format: List, Colors and Pictures.
12) Enter the title of the variants of this option. If the option is “Size”, the variants could be S – M – L – XL … The first column “Order” allows to choose the order of its variants presented on the shop.
13) Add a new variant
14) Delete a variant
The table lists all possible products with your created options.
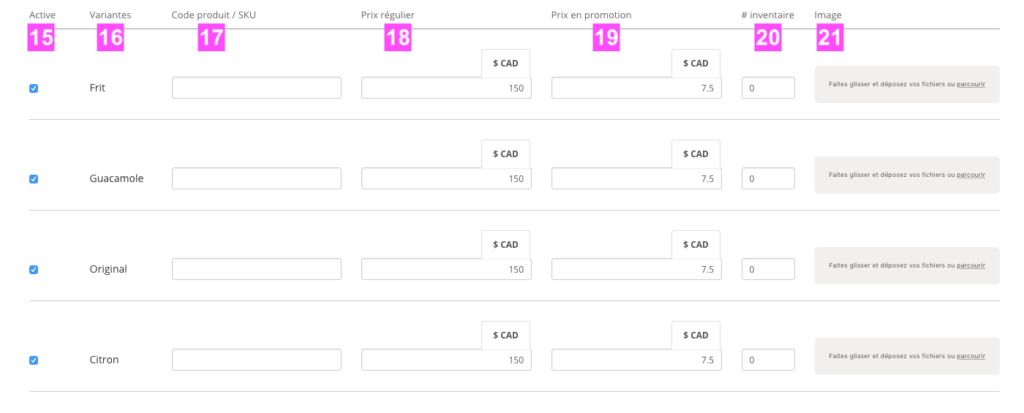
15) Enable or disable the visibility of this variant or mix of variants. You can disable it because you will never have it in stock or activate it later.
16) All variants or mix of existing variants.
17) Enter the SKU of each variant or mix of variants for this product.
18) The price listed is the regular price by default. You can modify it for some variants or mix of variants if necessary.
19) The listed price is the default promotion price. You can modify it for some variants or mix of variants if necessary.
20) If you have decided to manage the inventory in step 7, it is in this column that you enter the inventories of each line of variants.
21) Here you can add an image corresponding to this line of variant (s) so that on the shop the image of the product changes to its selection by the user. (optional)
The options
We put these 3 parts in one step because all are options, nothing is obligatory to modify for a simple product.
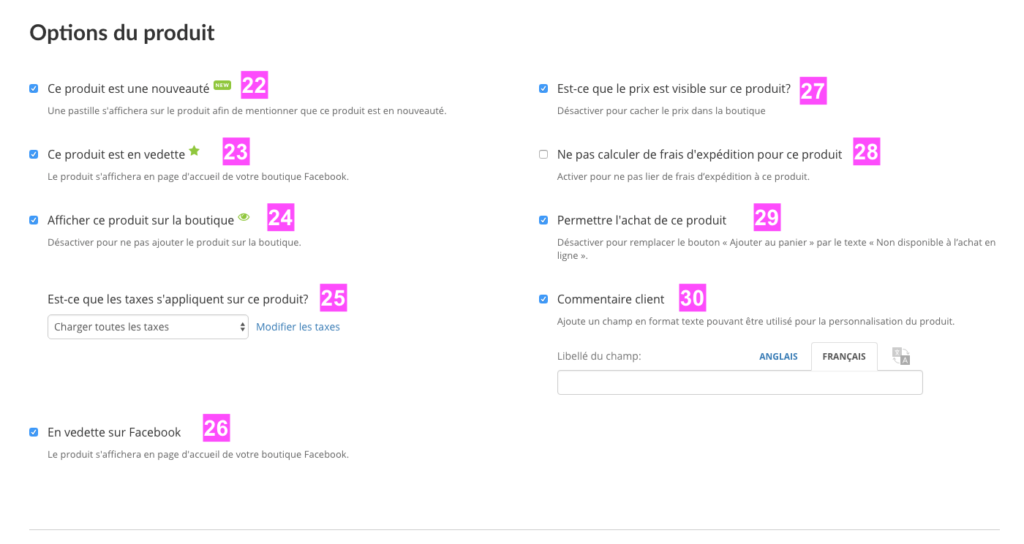
22) Check “New” to add a “New” banner to your product’s photo.
23) Check “Featured” to add your product on your shop’s homepage.
24) Uncheck if you do not want to display this product on your store. Allows you to make it unavailable for a certain time without having to delete it.
25) Choose the taxes to add to this product. Allows you to “Charge all taxes”, “Don’t charge taxes” or “Only charge federal tax”.
26) Check if you want to put this product on the front page of your Facebook store.
27) Untick if you do not want to display the price on your store. By doing this, the product will not be able to buy.
28) Check if you do not want to add shipping charges when you purchase this product.
29) Uncheck if you do not want to allow the purchase of the product.
30) Check to let your customer indicate how to link to this product for ordering.
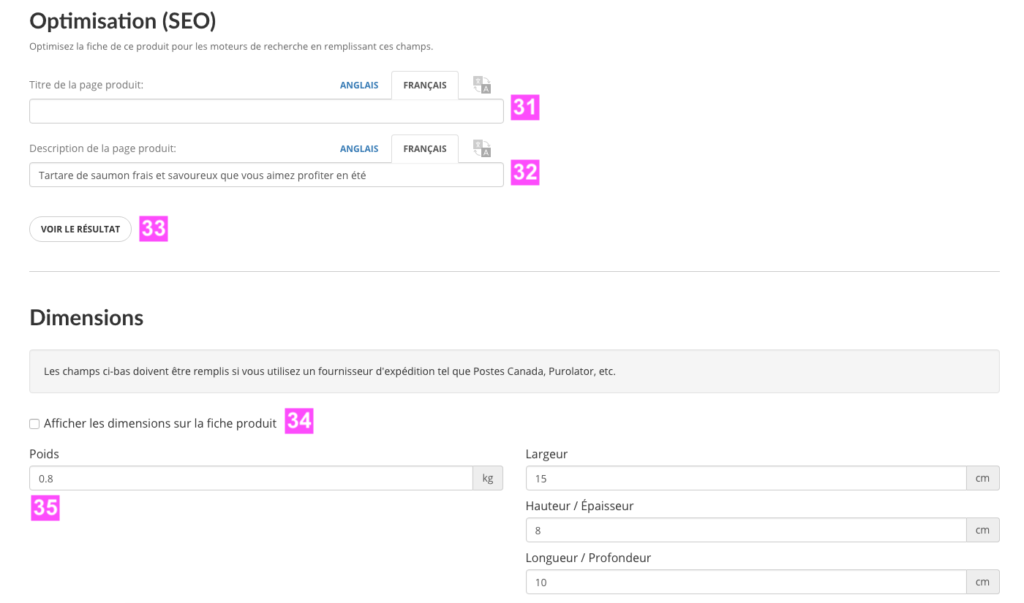
31) Allows you to add a title tag to be more sales and better referenced on Google and search engines.
32) Allows you to add a Meta-description to be more sales and better referenced on Google and search engines.
33) Click to see the result on Google and understand the advantage of points 31 and 32.
34) Check if you want to display the dimensions of your product (shown in point 35) in its description.
35) The dimensions are used to automatically calculate delivery prices and allow you to print your labels from home.
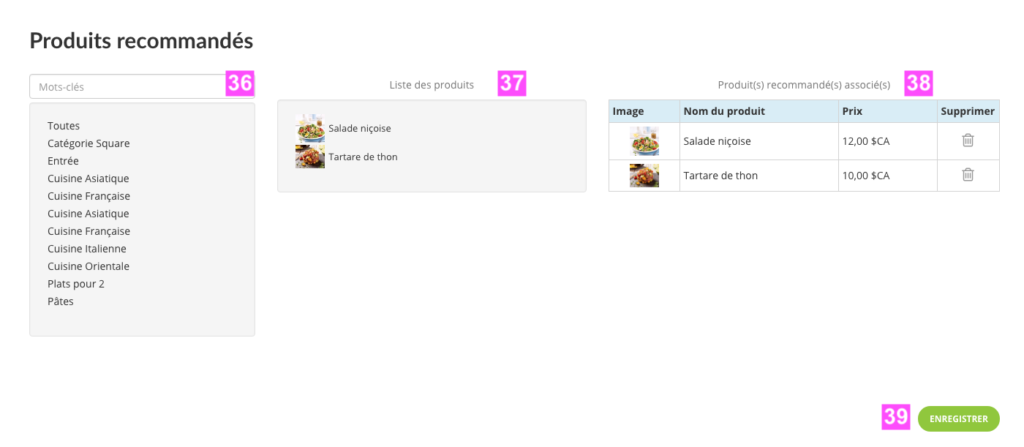
36) Choose a category or the entire store to display the list of products in column 37
37) Click on the products you want to add in “Recommended Products”
38) List of selected products. Click on the trash icon to delete the product.
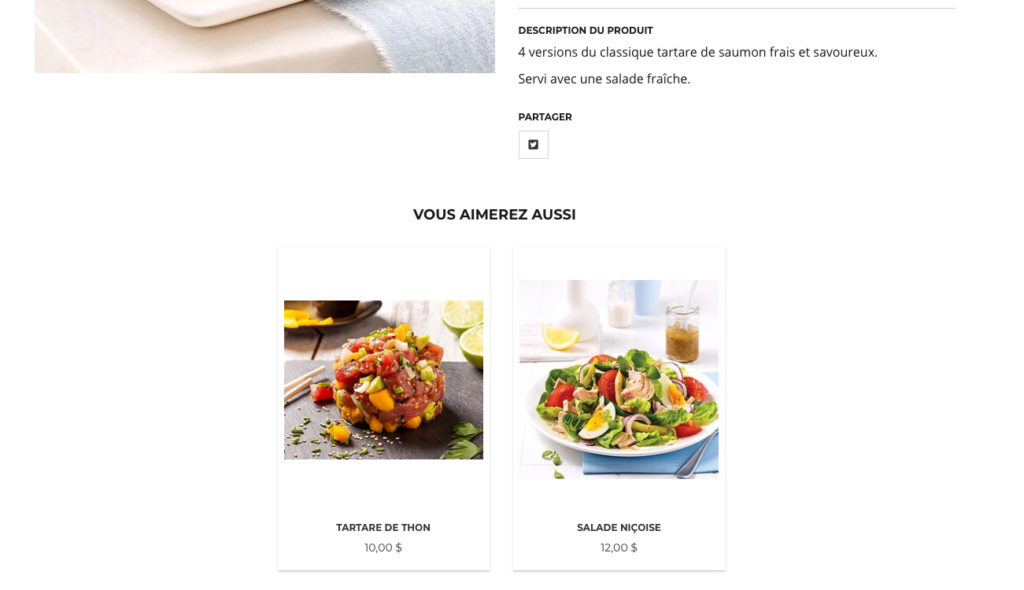
Example of how your recommended products will appear (Tokyo template)
39) And of course, remember to Save.


